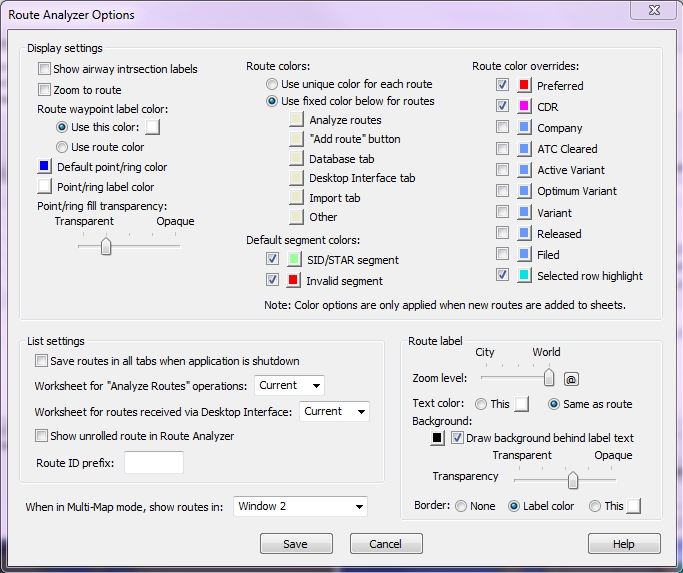
Route Analyzer Options Window
To Open the Route Analyzer Options window
- In Ribbon mode, click
 (Route Analyzer).
The Route Analyzer window appears. - In the Route Analyzer window, click Options at the bottom of the window.
The Route Analyzer Options window appears.
Display setting
In this area you will be able to set options for the route.
|
Item |
Description |
|
|---|---|---|
|
Show Airway Intersection Labels |
Select to show Airway Intersection Labels on-screen.
|
|
|
Zoom to Route |
Select to automatically zoom in and center the screen on any routes when Send Route Check is selected through Desktop Interface.
|
|
|
Route Waypoint Label Color |
Decide whether to use a custom color or the existing route color.
|
|
|
Default Point/Ring Color |
Click the color icon to customize the Point and Ring default color.
|
|
|
Point/Ring Label Color |
Click the color icon to customize the Point and Ring labels.
|
|
|
Point/Ring Transparency |
Select the transparency level for points and rings by moving the slider left for more transparency or right for more opacity.
|
|
|
Route Colors |
|
|
|
Use Unique color for each route |
Indicates whether you would like to use unique colors for each route. When you selected this radio button, Flight Explorer assigns a different color for each route that appears on the map.
|
|
|
Use Fixed color below for routes |
Indicates whether you would like to use the colors selected below.
|
|
|
Analyze Routes |
Select the default color of routes when Analyze Routes is selected from any Plane Context Menu. |
|
|
"Add Route" button |
Select the default color for any added routes. |
|
|
Database Tab |
Select the default color for all routes matching the database filter criteria. |
|
|
Desktop Interface Tab/Messages |
Select the default color for all routes coming in from Desktop Interface. |
|
|
Import Tab |
Select the default color for all routes coming in from the Import Tab. |
|
|
Other |
||
|
Default Segment Color |
Select the default color, for each option, when opening Route Analyzer. |
|
|
SID/STAR Segment |
Select to show SIDs and STARs and customize the default color. |
|
|
Invalid Segment |
Select to show any invalid route segments and customize the default color that designates the segment. |
|
|
Route color Overrides
|
Indicate which route color you want to override by selecting the check box. Then select the color box to change the color. |
|
|
Preferred |
Indicates FAA preferred routes. |
|
|
CDR |
Indicates FAA coded departure routes. |
|
|
Company |
Indicates routes airline specific company routes. |
|
|
ATC Cleared |
Indicates routes received from ATC source - route is flying. |
|
|
Active Variant |
Indicates a Flight Plan Manager active flight plan route. |
|
|
Optimum Variant |
Indicates Flight Plan Manager flight plan route. |
|
|
Variant |
Indicates a Flight Plan Manager calculated plan route. Multiple Variants may exist for each flight. |
|
|
Released |
Flight Plan Manager active flight plan route that has been released by the flight planner. |
|
|
Filed |
Indicates a route that has been filed with the ATC. |
|
|
Selected Row Highlight |
Indicates the graphical route highlight color for the currently selected route in the Route Analyzer sheet. When you hover over the route label, the route appears as this color. If you un-check this box, then hover over the route label, the route increases in size with the same color as the route. |
|
List Settings
This area allows you to save modify the listings.
|
List Settings |
Description |
|---|---|
|
Save Route in all Tabs when Application is Shutdown |
Click to save route criteria and routes when application shuts down. |
|
Worksheet for "Analyze Routes" operations |
Select the Worksheet number that will be used as default for Analyze Routes operations. |
|
Worksheet for Routes received via Desktop Interface |
Select the Worksheet number that will be used as default for Desktop Interface operations. |
|
Show Unrolled Route in Route Analyzer |
Click to reveal an unrolled route in Route Analyzer. |
|
Route ID Prefix |
Enter preferred route ID's to exclude other routes. |
|
When in Multi-Map mode, show routes in: |
List of windows where you can select which window to have the route appear. For example, you can have the routes appear on a particular window while another window is the active window. Select from:
|
This area allows you to modify the way the route tag appears on the map.
|
Item |
Description |
|---|---|
|
Zoom Levels |
Indicates the level you would like to have the route tags appear. When the slider is to the left (City) the labels will not appear. To turn the labels on the map you need to select Show Route label and move the slider to the right (World). Then you can make any changes to the appearance of the route tag. |
|
Text color |
|
|
Background |
|
|
Border |
|
Command Buttons
|
Item |
Description |
|---|---|
|
Save |
Saves and closes the window. |
|
Cancel |
Closes the window without saving any of the changes you made. |
|
Help |
Opens the help system. |
