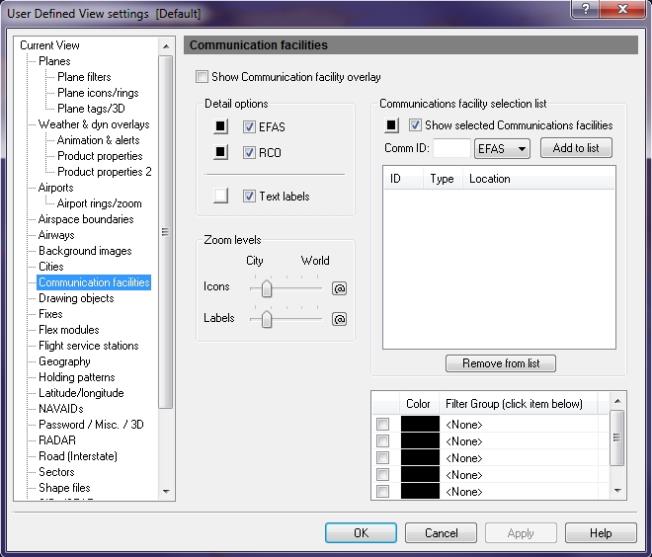
User Define View - Communication Facilities
To Activate a Comm. Facility View
The overlay must be enabled first by clicking the Show Communication Facility Overlay check box in User Defined View Settings -> Communication Facilities or by clicking the down arrow on the Communication Facilities Overlay icon on the Overlay Toolbar, then selecting Comm Fac.View Settings.
To open the Communication Facility window
- On the Main toolbar, click View Settings.
The User Defined View Settings window appears. - In the User Defined View Settings window, click Communication Facility.
The Communication Facility window appears.
To Use a Communication Facility View
Click the View Settings icon on the Main toolbar, User Defined View Settings (CTRL + V) on the View menu, and then click Communication Facilities, or the down arrow on the Communication Facilities Overlay icon on the Overlay toolbar, then Comm Fac. View Settings.
![]() Click to see the User Defined View Comm. Facilities window
Click to see the User Defined View Comm. Facilities window
|
Item |
Description |
|---|---|
|
EFAS |
Stands for En Route flight Advisory Service. Click the color box next to the check box if you want to change the color of the EFAS that appears on the map. |
|
RCO |
Stands for Remote Communications Outlet. Click the color box next to the check box if you want to change the color of the RCO that appears on the map. |
|
Filter Group (1) Filter Group (2) ... |
Displays what is defined in Filter Groups assigned to overlay in User Defined View settings. Up to 5 groups supported. Click the color box next to the check box if you want to change the color of the filter groups that appears on the map. |
|
Text Labels |
Labels are shown at the facility. Click the arrow on the Communication Facilities Overlay icon, and then click ShowText Labels, to turn the overlay on. Click the color box next to the check box if you want to change the color of the text labels that appears on the map. |
|
Detail Options |
More than one facility can be selected by clicking the corresponding checkbox. Select colors for each by clicking the appropriate color button. Labels can be turned on or off, and a color can also be selected. |
|
Zoom Levels |
Use the slider to choose the level that icons and labels are visible on-screen. Click the @ button to select the current zoom level. The corresponding item will be visible from the selected zoom level to the lowest zoom level (city). |
|
Communication Facility Selection List |
Individual Communication facilities can be turned on by adding them to the selection list. To show the facilities listed in the selection list, click the check box labeled Show Selected Communication Facilities. To select the color in which these communication facilities will be shown, click open the color palette, click the color you want and then click Apply. |
|
Communication Faciltiy Filter Group List |
Groups of communication facilities can be turned on by adding them to the Filter Group selection list (see Tools, Features, & Settings -> Options -> Filter Groups for more information).
|
