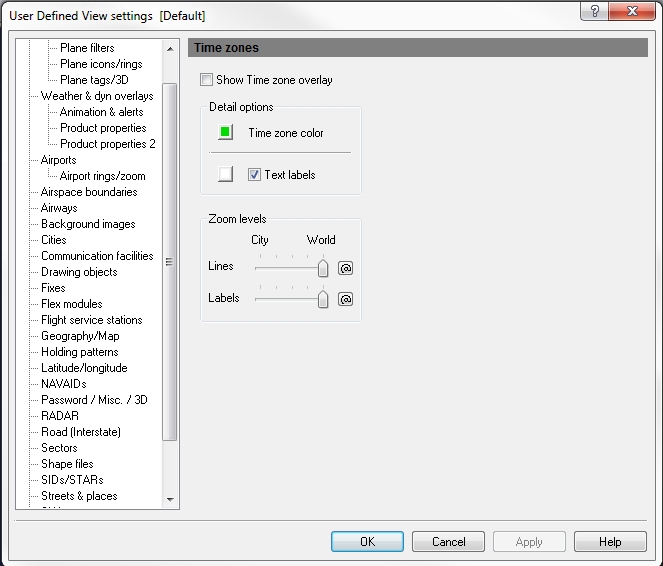
User Defined View Times Zones
Time Zones boundaries are shown as lines and are preset within Flight Explorer.
To Use Time Zone View
Click the View Settings icon on the Main toolbar, User Defined View Settings (CTRL + V) on the View menu, and then click Time Zones, or the down arrow on the Time Zones Overlay icon on the Overlay toolbar, then Time Zones View Settings.
![]() Click to see the User Defined View Time Zones
window
Click to see the User Defined View Time Zones
window
|
Item |
Description |
|---|---|
Detail Options |
Click the color button to select boundary colors, by clicking the color button and selecting a color. Time zone text labels can be turned on or off, and a color can be selected. |
|
Time Zone Color |
Select a color to represent time zone line. |
|
Text Labels |
Labels are shown in the time zone. Click the arrow on the Time Zones Overlay icon, and then click Show Text Labels, to turn the overlay on. |
Zoom Levels |
Use the slider to choose the level that lines and labels are visible on-screen. Click the @ button to select the current zoom level. The corresponding item will be visible from the selected zoom level to the lowest zoom level (city). |
To Activate Time Zone View
The overlay must be enabled first by clicking the Show Time Zone Overlay check box in User Defined View Settings -> Time Zones or by clicking the down arrow on the Time Zones Overlay icon on the Overlay Toolbar, then selecting Time Zones View Settings.
To turn on the Time Zones overlay, click the Time Zones Overlay icon on the Overlay toolbar, or select Time Zones (ALT +Z) on the Overlays menu.
To Select Color
- Click the color box to open the color palette.
- Select the desired color. The palette closes when a color is selected.
- Click Apply.
